
Imaging Compact Flash with USB Adapter: Difference between revisions
Created page with "<p>This procedure can be used to create an image file from an existing Compact Flash or to image a Compact Flash from an image file. The procedure can be use for 1gig CF for LX-800 or 512mb CF for LPMTX. The CF must be the black labeled WinSystems CF only and the image file must match the CF capacity, i.e., 1gig image file to 1gig CF. Since it is an image, both partitions/drives of the CF are handled by this process.</p> {| style="border-collapse: collapse; width:..." |
mNo edit summary |
||
| (One intermediate revision by the same user not shown) | |||
| Line 23: | Line 23: | ||
#Allow Windows to identify the drive and note the drive designation. If autorun is not enabled, use the File Explorer to find the appropriate drive designation. | #Allow Windows to identify the drive and note the drive designation. If autorun is not enabled, use the File Explorer to find the appropriate drive designation. | ||
#Launch the Win32 DiskImager application by clicking the desktop icon. | #Launch the Win32 DiskImager application by clicking the desktop icon. | ||
#Click on the folder icon to browse to the desired folder. | #Click on the folder icon to browse to the desired folder.[[image:img1741199921225.png|412x208px|center|frameless]] | ||
#In the file dialog, enter the file name of the image file you wish to create from the CF with “IMG” extension. (i.e. Master 1gig.IMG) | #In the file dialog, enter the file name of the image file you wish to create from the CF with “IMG” extension. (i.e. Master 1gig.IMG)[[image:img1741208227123.png|264px|center|frameless]] | ||
#Click the “Open” button. | #Click the “Open” button. | ||
#Click the “Device” drop-down and select the drive Windows identified earlier. | #Click the “Device” drop-down and select the drive Windows identified earlier. | ||
#Click the “Read” button to start. A progress bar will appear. | #Click the “Read” button to start. A progress bar will appear.[[image:img1741247578227.png|413px|center|frameless]] | ||
#When successfully done, a “Read Successful” box will pop up. Otherwise an error message will be displayed. If good, click OK and remove the CF from the adapter. | #When successfully done, a “Read Successful” box will pop up. Otherwise an error message will be displayed. If good, click OK and remove the CF from the adapter.[[image:img1741246987823.png|158x115px|center|frameless]] | ||
<p>''' '''</p> | <p>''' '''</p> | ||
== Imaging a Compact Flash Card From an Image File == | == Imaging a Compact Flash Card From an Image File == | ||
| Line 35: | Line 36: | ||
#Allow Windows to identify the drive and note the drive designation. If autorun is not enabled, use the File Explorer to find the appropriate drive designation. | #Allow Windows to identify the drive and note the drive designation. If autorun is not enabled, use the File Explorer to find the appropriate drive designation. | ||
#Launch the Win32 DiskImager application by clicking the desktop icon. | #Launch the Win32 DiskImager application by clicking the desktop icon. | ||
#Click on the folder icon to browse to the desired image file. | #Click on the folder icon to browse to the desired image file.[[image:img1741218667474.png|412px|center|frameless]] | ||
#Click on the file (i.e. Master 1gig.IMG) | #Click on the file (i.e. Master 1gig.IMG)[[image:img1741286198512.png|647px|center|frameless]] | ||
#Click the “Open” button. | #Click the “Open” button. | ||
#Click the “Device” drop-down and select the drive Windows identified earlier. | #Click the “Device” drop-down and select the drive Windows identified earlier. | ||
#Click the “Write” button to start. | #Click the “Write” button to start.[[image:img1741198212648.png|412px|center|frameless]] | ||
#A warning box will appear. If you do want to write to the CF, click “Yes”. A progress bar will appear. | #A warning box will appear. If you do want to write to the CF, click “Yes”. A progress bar will appear.[[image:img1741235541472.png|322px|center|frameless]] | ||
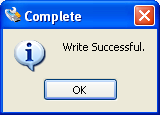
#When successfully done, a “Write Successful” box will pop up. Otherwise an error message will be displayed. If good, Click OK and remove the CF from the adapter. Label accordingly. | #When successfully done, a “Write Successful” box will pop up. Otherwise an error message will be displayed. If good, Click OK and remove the CF from the adapter. Label accordingly.[[image:img1741288849894.png|160px|center|frameless]] | ||
#If imaging more CF’s from the same image file, insert next CF, click the “Write” button and proceed as above. | #If imaging more CF’s from the same image file, insert next CF, click the “Write” button and proceed as above. | ||
#When finished, exit the Win32 DiskImager utility. | #When finished, exit the Win32 DiskImager utility. | ||
[[Category:Procedures]] | |||
Latest revision as of 18:23, 7 April 2025
This procedure can be used to create an image file from an existing Compact Flash or to image a Compact Flash from an image file. The procedure can be use for 1gig CF for LX-800 or 512mb CF for LPMTX. The CF must be the black labeled WinSystems CF only and the image file must match the CF capacity, i.e., 1gig image file to 1gig CF. Since it is an image, both partitions/drives of the CF are handled by this process.
Note: |
Only use WinSystems branded CF card. DO NOT use Transcend or off-the-shelf CF cards as they may be incompatible or unreliable. | |
Equipment Requirements
Laptop or desktop computer
USB to Compact Flash adapter
Flash imaging utility. This document details Win32 DiskImager.
Compact Flash card to create image or to be imaged.
- 512mb for LPMTX Processor
- 1gig for LX-800 Processor
Preparation
- Win32 DiskImager is a free utility available from numerous sources on the internet. Download the zip file and extract to a clean folder on your computer.
- Create a desktop icon from the executable file in the folder.
- Connect the USB to Compact Flash adapter and allow Windows to install drivers if necessary.
NOTE: It is recommended that no other Flash drives or Thumb drives are connected to the computer while running this utility. Exit any program that may access the Flash drives. (e.g. Media Player)
Procedures
Creating an Image File From a Compact Flash Card
- Insert the appropriate Compact Flash into the adapter.
- Allow Windows to identify the drive and note the drive designation. If autorun is not enabled, use the File Explorer to find the appropriate drive designation.
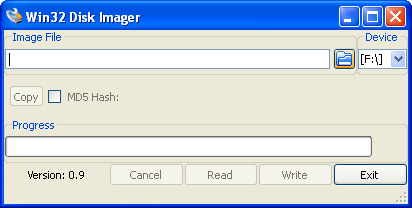
- Launch the Win32 DiskImager application by clicking the desktop icon.
- Click on the folder icon to browse to the desired folder.
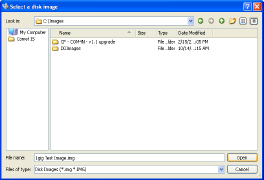
- In the file dialog, enter the file name of the image file you wish to create from the CF with “IMG” extension. (i.e. Master 1gig.IMG)
- Click the “Open” button.
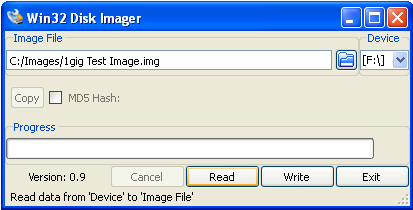
- Click the “Device” drop-down and select the drive Windows identified earlier.
- Click the “Read” button to start. A progress bar will appear.
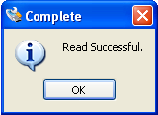
- When successfully done, a “Read Successful” box will pop up. Otherwise an error message will be displayed. If good, click OK and remove the CF from the adapter.


Imaging a Compact Flash Card From an Image File
- Insert the appropriate Compact Flash into the adapter.
- Allow Windows to identify the drive and note the drive designation. If autorun is not enabled, use the File Explorer to find the appropriate drive designation.
- Launch the Win32 DiskImager application by clicking the desktop icon.
- Click on the folder icon to browse to the desired image file.
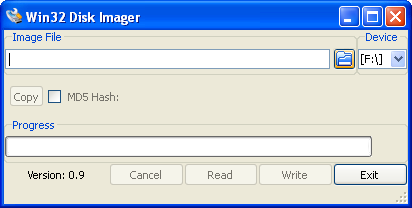
- Click on the file (i.e. Master 1gig.IMG)
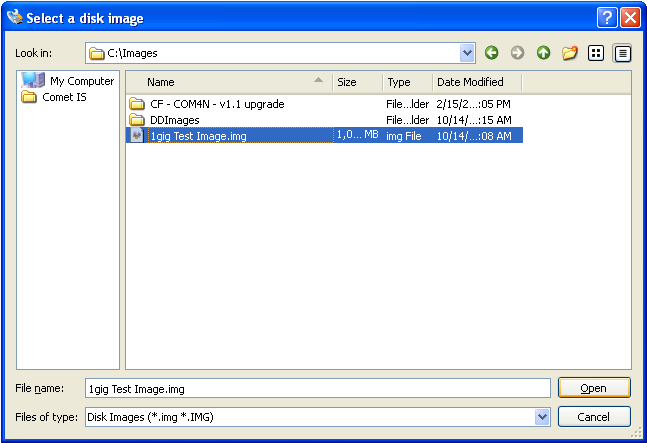
- Click the “Open” button.
- Click the “Device” drop-down and select the drive Windows identified earlier.
- Click the “Write” button to start.
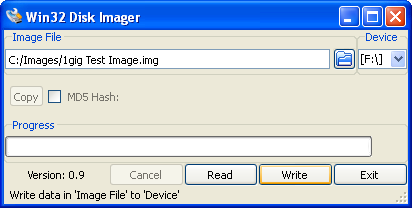
- A warning box will appear. If you do want to write to the CF, click “Yes”. A progress bar will appear.
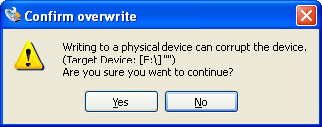
- When successfully done, a “Write Successful” box will pop up. Otherwise an error message will be displayed. If good, Click OK and remove the CF from the adapter. Label accordingly.
- If imaging more CF’s from the same image file, insert next CF, click the “Write” button and proceed as above.
- When finished, exit the Win32 DiskImager utility.


